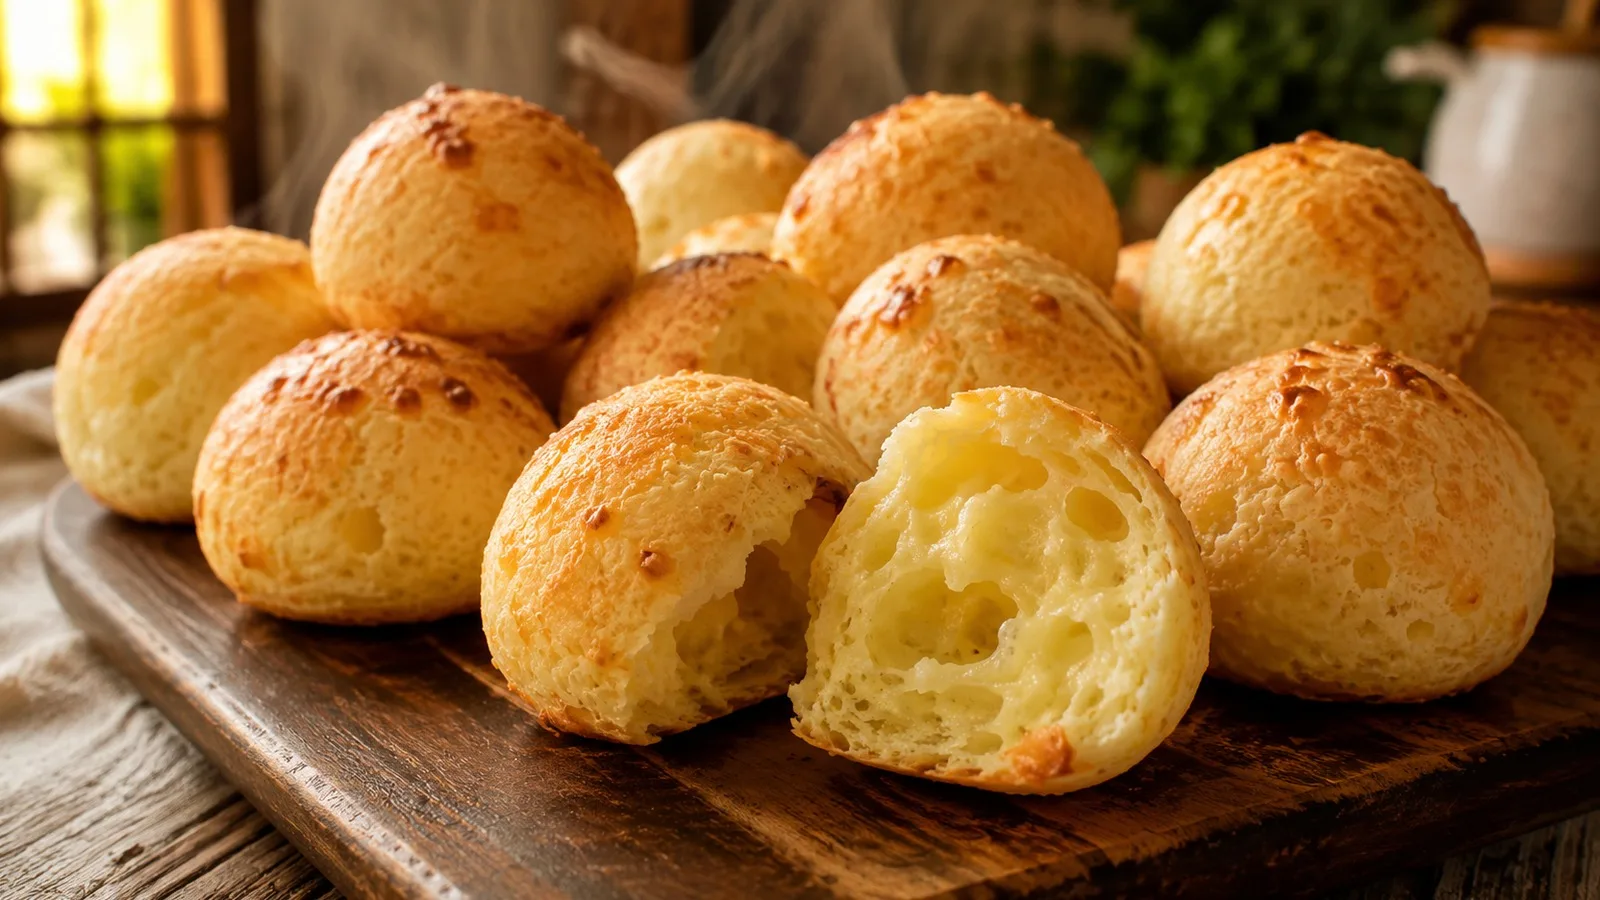
This formulation uses 60% sour tapioca starch and 40% sweet tapioca starch to balance expansion and softness. The expected result is a light cheese bread, with a thin, golden crust, and an airy, elastic crumb. A small contraction when cooling is normal; The aim is to prevent the units from collapsing, flattening or ending up with an excessively wet and rubbery center.
Ingredients
• 210 g of sour cassava starch
• 140 g of sweet cassava starch
• 140 g of whole milk
• 70 g of water
• 50 g of neutral oil, such as sunflower, corn or canola
• 6 g of salt
• 100 g of beaten eggs, without shell, equivalent to about 2 large eggs
• 230 g firm semi-cured Minas cheese, coarsely grated
• Oil in a small amount to grease your hands, if necessary
Preparation method
1. Heat the oven for real
Position the rack in the middle of the oven and preheat to 220°C for at least 30 minutes. If you have an oven thermometer, use it: in a domestic oven, the temperature indicated on the panel can differ significantly from the actual temperature. Set aside a large baking dish, measuring approximately 40 x 30 cm, and grease it with a thin film of oil.
2. Mix the sprinkles
Place the sour cassava starch, sweet cassava starch and salt in a large bowl. Mix until the color and texture are uniform, breaking up any dry lumps with your fingers.
3. Do the blanching
Bring the milk, water and oil to a boil over high heat. As soon as the mixture comes to a real boil, immediately pour it over the tapioca starch in 3 or 4 additions, stirring with a firm spatula after each one. Continue mixing for about 2 minutes, pressing the lumps against the bowl to hydrate all the starch.
The correct point after blanching is a heavy, irregular mass, made up of moist lumps and slightly translucent pieces of starch. There should be no pockets of completely dry starch at the bottom of the bowl. It still won't be smooth or modelable.
4. Let the blanching cool down
Spread the dough around the bowl to lose heat and wait 15 to 20 minutes. Before adding eggs and cheese, it should be just warm to the touch, never hot. If using a thermometer, expect it to drop to around 45°C or below. This pause reduces the risk of cooking the eggs or causing the cheese to release fat too soon.
5. Add the eggs
Add the 100 g of beaten eggs in 3 additions. With each addition, knead and fold the dough until the liquid disappears before adding the next part. At first the mixture appears to separate; keep working until it becomes cohesive again.
When the eggs are finished, the dough should be moist, sticky and flexible, but still heavy. When squeezed in your hand, it should hold its shape for a few seconds instead of running out. As the eggs were weighed, it is not necessary to correct the point with raw cassava starch.
6. Add the cheese
Add the semi-cured cheese and knead for 2 to 3 minutes, just until it is distributed throughout the dough. The cheese should still be visible in small threads and dots; the bowl should not be left with a pool of grease. If the dough is still hot and the cheese starts to melt, stop and let it cool for a few more minutes before continuing.
7. Weigh and model
Divide the dough into 24 portions of approximately 39 g. Lightly grease your hands only if the dough is too sticky and shape into smooth balls, without pressing them down too hard. Spread onto the baking tray, leaving about 4 cm between them.. Keeping them all at a similar weight helps the center bake at the same rate and reduces the chance of large units deflating inside while they are still moist.
8. Bake at two temperatures
Place in the oven at 220°C and do not open the door for the first 12 minutes. During this period, the balls should inflate and begin to firm up the surface. Without opening the door, reduce the temperature to 200°C and bake for another 15 to 18 minutes.
From 25 minutes total, watch through the door. Remove them when they are well grown, with dry skin, medium to intense golden color and small cracks. Cheese bread that is only pale usually still has too much moisture to support the structure after it comes out of the oven.
9. Test after cooling
Transfer the cheese breads to a wire rack and wait 10 minutes before evaluating. They may contract a little, but they should remain rounded and light. Open one unit: the crumb should show irregular pockets, with no strip of raw dough or shiny paste in the center.
Right spot / how to know it’s ready
Properly blanched is moist throughout, with heavy lumps and some starchy areas; If there is any dry powder left, the liquid has not been distributed sufficiently.
The final dough is sticky but holds a ball. If it immediately drips or flattens on the baking sheet, it is too wet. If it cracks a lot when modeling and appears brittle, it is too dry.
In the oven, the cheese bread must first puff up and only then gain color. The starting point is a dry, well-golden skin, a firm base and a cooked, airy and elastic interior. After 10 minutes out of the oven, it should retain its overall shape. A slight twitch is normal; turning a flat disk is not.
Tips for the recipe to work out
Use the scale from beginning to end
Starch, eggs and cheese vary greatly when measured per cup. By weighing the ingredients and portions, you can better control hydration and prevent some units from baking less than others.
Give function to each starch
In this recipe, the sour cassava starch makes up the majority of the mixture because it favors the expansion and formation of alveoli. The sweet comes in to moderate this expansion and make the crumb softer and more stable. Changing the proportion clearly changes the texture.
Do not add eggs and cheese to hot dishes
The dough needs to warm up. Partially coagulated egg and cheese releasing fat make the mixture irregular and make it difficult to form a homogeneous structure in the oven.
Do not try to correct a soft dough by pouring in raw cassava starch
Starch added at the end does not undergo the same blanching process and can leave dry, dense or mealy spots. The best control is to weigh the eggs and use firm cheese, not overly moist.
Confirm oven temperature when failure occurs again
If the dough is correct and the bread remains low or pale, an oven operating below the set temperature is a likely cause. A simple thermometer helps diagnose this problem.
Substitutions and variations
If you cannot find semi-cured Minas cheese, use 180 g of firm standard Minas with 50 g of grated parmesan. As Parmesan tends to be saltier, reduce the salt in the pasta to around 4 g and adjust in the next batches depending on the cheese used.
Using only sour tapioca flour tends to produce more expansive, hollow and crunchy units, with a more irregular shape. Using only sweet tapioca flour tends to produce cheese bread that is more compact, soft and has less expansion.. For the purposes of this recipe, mixing the two is more predictable.
Milk can be replaced with the same weight of water, but the cheese bread loses part of its dairy flavor and tends to brown less. This change does not transform the recipe into a dairy-free option because the cheese is still present.
How to store
For best texture, serve the day you bake. Once completely cooled, the cheese breads can be kept in a tightly closed container for up to 1 day in a cool environment. If you need to store it for longer, refrigerate it within 2 hours of preparation and consume it within 3 to 4 days. Reheat in the oven at 180°C for about 5 to 8 minutes to recover part of the crust.
To freeze, prefer raw dough that has already been shaped. Freeze the separate balls on a baking sheet until firm and then transfer to a freezer bag. For best quality, use within 2 months. Bake while still frozen in a preheated oven at 210 °C, adding a few minutes to the time and observing color and structure, not just the clock.
How to serve / side dishes
Serve warm, when the crumb is more elastic and aromatic. Brewed coffee, coffee with milk, cream cheese and guava paste go well together. If serving later, heat for a few minutes in a conventional oven or air fryer instead of the microwave, which tends to soften the skin.
Common mistakes
Why did my cheese bread deflate a lot after coming out of the oven?
The most likely causes are an oven below the actual temperature, early removal with the skin still pale, dough that is too wet or large units that have risen before the center has set. For the next batch, confirm 220 °C at the beginning, weigh 39 g per unit and bake until the skin is dry and golden.
Why was it rubbery instead of airy?
A little elasticity is part of cheese bread. The problem is when the center becomes compact, shiny and excessively gummy. This can happen due to insufficient baking, excess moisture, very moist cheese or a high proportion of sweet cassava starch. Bake until the indicated color and keep the starch mixture in the formula.
Why didn't it grow?
Sour starch is responsible for much of the expansion capacity and its quality varies between brands and batches. An underheated oven, poorly distributed blanching or very dry dough will also harm growth. If the method and weighing are correct and the problem persists, try another sour tapioca.
Why did the balls spread out on the baking sheet?
The dough was too wet or too hot, the eggs were not weighed or the cheese used had too much water and fat. The finished dough should be sticky, but maintain its ball shape before going into the oven.
Why did the shell crack?
Small cracks are normal and desirable. Very open cracks and an excessively irregular shape may indicate dry dough, a high proportion of sour starch or an initial heat that is too aggressive for your oven. Check the weighings and, if necessary, reduce the start to 210 °C for the next batch without changing the liquids.