Ingredients
• 500 g of wheat flour, preferably with 11% to 13% protein, plus a small amount of the same flour for dusting
• 350 g of drinking water at room temperature
• 4 g of instant dry yeast
• 10 g of salt
Preparation method
1. Hydrate the flour
Put the flour in a large bowl and reserve 20 g of the water. Add the remaining 330 g to the flour and mix just until there are no dry spots. The dough will be lumpy and sticky. Cover and let rest for 30 minutes. This rest allows the flour to absorb water before developing the dough.
2. Add yeast and salt
Mix the yeast in the reserved 20 g of water and pour over the dough. Add the salt. Press, fold and turn the dough inside the bowl for about 4 to 5 minutes, until the water is absorbed and the dough becomes more uniform. It should still be soft and slightly sticky; do not amend with extra flour.
3. Do bulk fermentation and folding
Cover and let it ferment for 1 hour and 30 minutes in a mild environment, ideally around 24°C to 26°C. After 30 minutes, make a series of four folds: pull one edge of the dough up and fold over the center, rotate the bowl and repeat until you complete the turn. Repeat the series at 60 minutes. After the second fold, let the dough rest for another 30 minutes.
At the end, look for a clear increase in volume, a more domed surface and small bubbles at the edges. The dough does not need to double in size. In a cold kitchen, fermentation may take another 20 to 40 minutes; use these signs as your main reference.
4. Split and pre-shape
Carefully turn the dough onto a lightly floured surface. Divide into three portions of approximately 288 g. Without expelling all the gas, form each portion into a short cylinder, bringing the edges to the center and closing the seam. Cover and let relax for 20 minutes.
5. Shape the baguettes
Work with one portion at a time. Gently flatten the cylinder into a short rectangle, preserving any larger bubbles. Fold the top third towards the center and press the seam with the heel of your fingers. Fold again to close the dough on itself and seal the seam without crushing the crumb.
With the seam facing down, roll from the center to the ends until you form a baguette measuring about 30 to 35 cm, slightly tapering the ends. Transfer to a metal baking tray lined with baking paper, leaving space between the pieces.
6. Make the final fermentation and heat the oven
Cover the baguettes loosely and let them rise for 45 to 60 minutes. After about 20 minutes, heat the oven to 250°C and place an empty baking tray or sturdy metal pan on the lowest rack; it will only be used to generate steam.
The baguette is ready to receive the cuts when it appears lighter and more airy. By pressing very gently on the side with a floured fingertip, the mark should return slowly and remain only discreetly visible. If the dough springs back immediately, give it more time; If it sinks and doesn't react, bake without waiting any longer.
7. Make the cuts
Boil approximately 150 ml of water. Only uncover the baguettes when baking. With a baker's blade or very sharp knife, make four oblique cuts in each piece, almost parallel to the length of the baguette, about 0.5 cm to 1 cm deep. Make each cut begin before the previous one ends to create a continuous line of expansion.
8. Bake with steam
Take the baking tray with the baguettes to the central rack. Keeping your face and hands away from the steam outlet, pour the 150 ml of boiling water into the hot metal container on the lower rack and close the door immediately. Do not use a glass or ceramic container for this step, as the thermal shock may break it.
Bake for 10 minutes at 250°C. Open the door for about 5 seconds to release excess moisture, reduce to 230°C and bake for a further 12 to 16 minutes, until the baguettes are intensely golden. If the oven browns unevenly, rotate the pan only after the first 10 minutes.
9. Cool before cutting
Transfer the baguettes to a wire rack and wait at least 40 minutes before opening one. Cooling finishes stabilizing the crumb and helps keep the shell dry. Cutting while it is still very hot can leave the impression of a moist or gummy crumb even when the bread has been well baked.
Right spot / how to know it’s ready
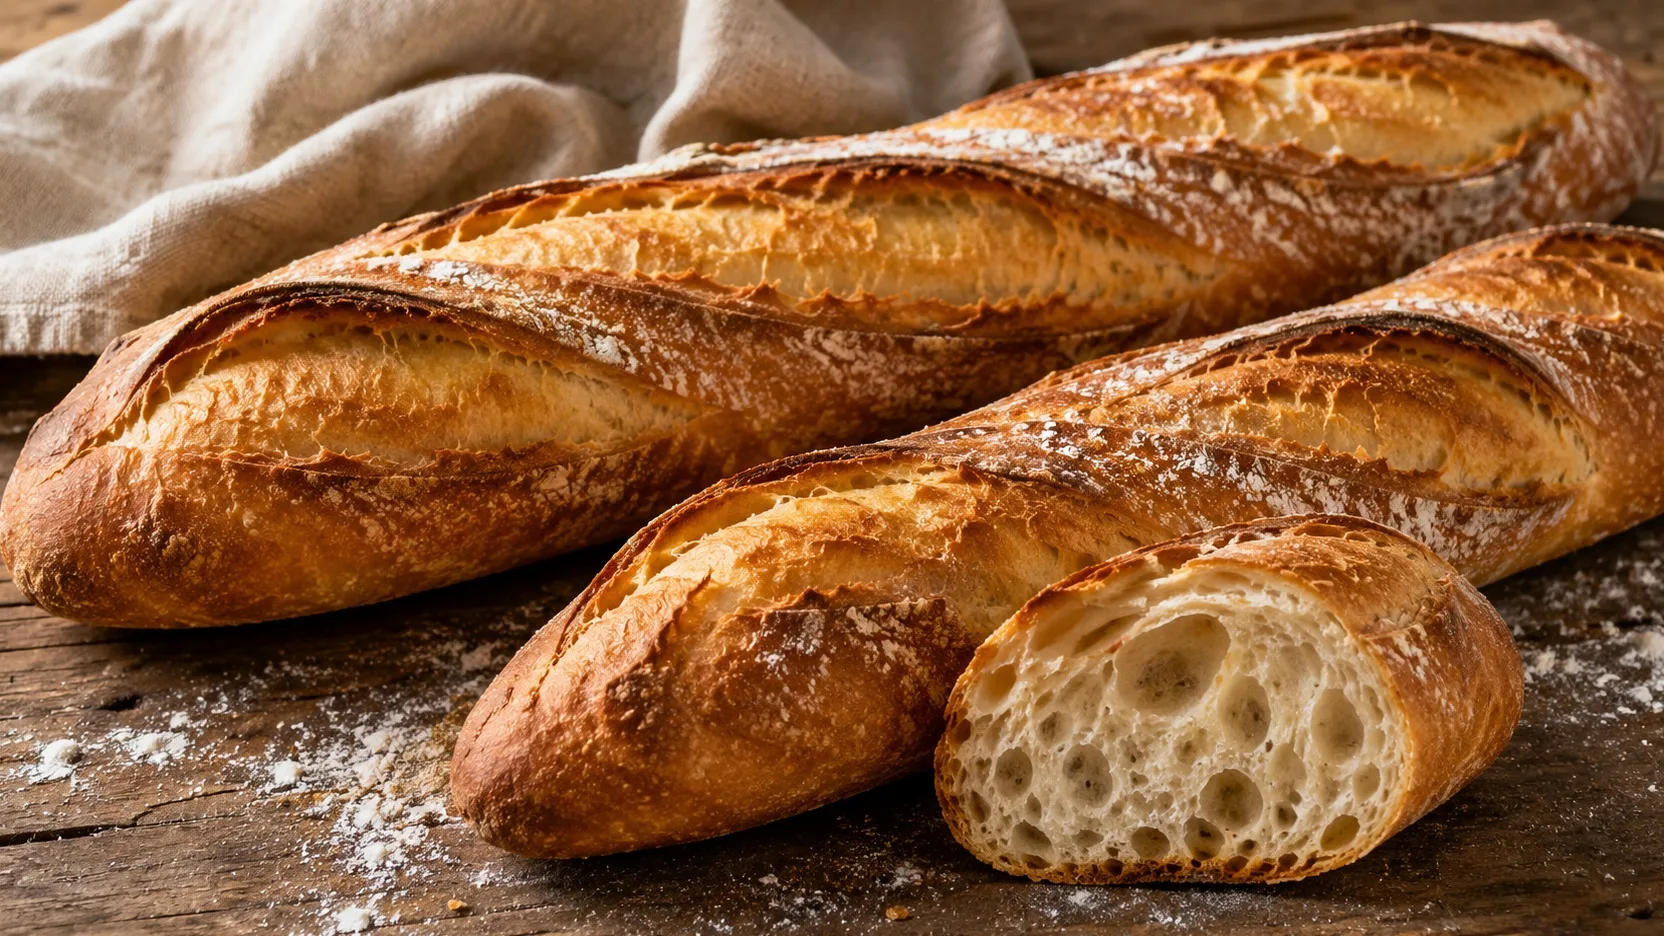
The finished baguette must have a firm, dry and intensely golden skin, not just beige. The cuts should have visibly opened and the piece should feel light for its size. When it comes out of the oven, the crust may make small crackles as it cools.
After cooling, the crumb must be cooked and elastic, with alveoli of varying sizes and no wet or compact band near the base. A domestic baguette can have an irregular crumb without having giant holes; the goal is lightness and good expansion, not a specific alveolar geometry.
Tips for the recipe to work out
Weigh the ingredients
The difference between a firm dough and an excessively soft dough is small in high-hydration breads. Weighing flour and water is more reliable than using cups and maintains the 70% hydration predicted in the formula.
Do not dry the dough with flour
The dough starts out sticky and gains structure with rest and folding. Adding a lot of flour to the counter reduces hydration, makes modeling apparently easier, but tends to produce a more closed and heavier crumb.
Preserve gas when modeling
In pre-shaping and final shaping, only remove very large bubbles that interfere with the shape. Pressing the dough as if you were rolling out pizza dough expels accumulated gas and shrinks the alveoli.
Use steam only at the beginning
The steam delays the formation of the crust in the first few minutes and allows greater expansion of the cuts. Afterwards, the oven needs to be drier for the skin to gain color and crunch.
Wait for it to cool down
The crust becomes crispier and the crumb more stable when the bread cools on a rack, with air circulation underneath. Leaving the baguette hot in the pan accumulates steam in the base and softens the crust.
Substitutions and variations
Can I use regular wheat flour?
Yes. If the flour has a lower protein content or absorbs little water, start with 330 g of water and keep the final 20 g reserved. After the initial rest, add this water little by little only if the dough is firm. Less water makes shaping easier, but usually results in a slightly less open crumb.
Can I use bread flour?
Yes. Stronger flours typically withstand this hydration well and can produce a more elastic dough. Depending on the brand, the dough may require an additional 5 g to 15 g of water; Only make this adjustment after the initial rest, observing the texture.
Can I add wholemeal flour?
For a first variation, replace up to 75 g of white flour with wholemeal flour. The bran absorbs more water and interferes with expansion, so the crumb tends to be less open; If necessary, add water in small portions until you get a soft dough.
How to store
The baguette has the best texture the day it is baked. To consume the next day, let it cool completely and store in a paper bag or wrapped in a clean cloth, at room temperature. The shell will lose some of its crunchiness; to recover, heat at 200°C for about 5 to 7 minutes.
To store it for longer, freeze the cold baguette, whole or in pieces, well wrapped, for up to 3 months. Reheat directly from the freezer in a 180°C to 200°C oven until the center is hot and the crust is dry again.
How to serve / side dishes
Serve the baguette plain, on the same day, with butter, cheese, jams, soups or stews. It also works as a base for sandwiches and tartines. To preserve the crunchiness, cut only the amount that will be consumed.
Common mistakes
Why did my baguette spread on the baking sheet?
The most common causes are overdone yeast dough, too little flour for the amount of water or modeling without enough tension. Next time, shorten the final proof, retain 15 g to 20 g of water if the flour is weak and take care to close the seam during modeling.
Why was the crumb dense and with few alveoli?
Short fermentation, excess flour on the counter and aggressive degassing are common causes. Give the dough time to gain volume and bubbles, make the expected folds and shape with enough pressure to give it shape, but without crushing the entire structure.
Why didn't the cuts open?
Cuts that are too shallow, made crosswise, lack of steam or dough that is past its final fermentation limit the opening. Use a very sharp blade at an oblique angle, make cuts almost parallel to the length and bake as soon as the dough reaches proof point.
Why did the crust turn pale or soften quickly?
Oven underheating produces little expansion and little color. Really preheat, bake until deep golden brown and let the excess steam escape after the first 10 minutes. After baking, always cool on a rack and do not pack the bread while it is warm.